Python环境最佳实践
Python环境
推荐采用Anaconda作为Python环境,可以避免大量的兼容性问题;推荐采用python >= 3.5作为python的基础版本。
通常安装 TensorFlow分为两种情况:
- 只使用CPU:这种安装相对容易。
- 使用了GPU:还需安装CUDA和cuDNN。
IDE
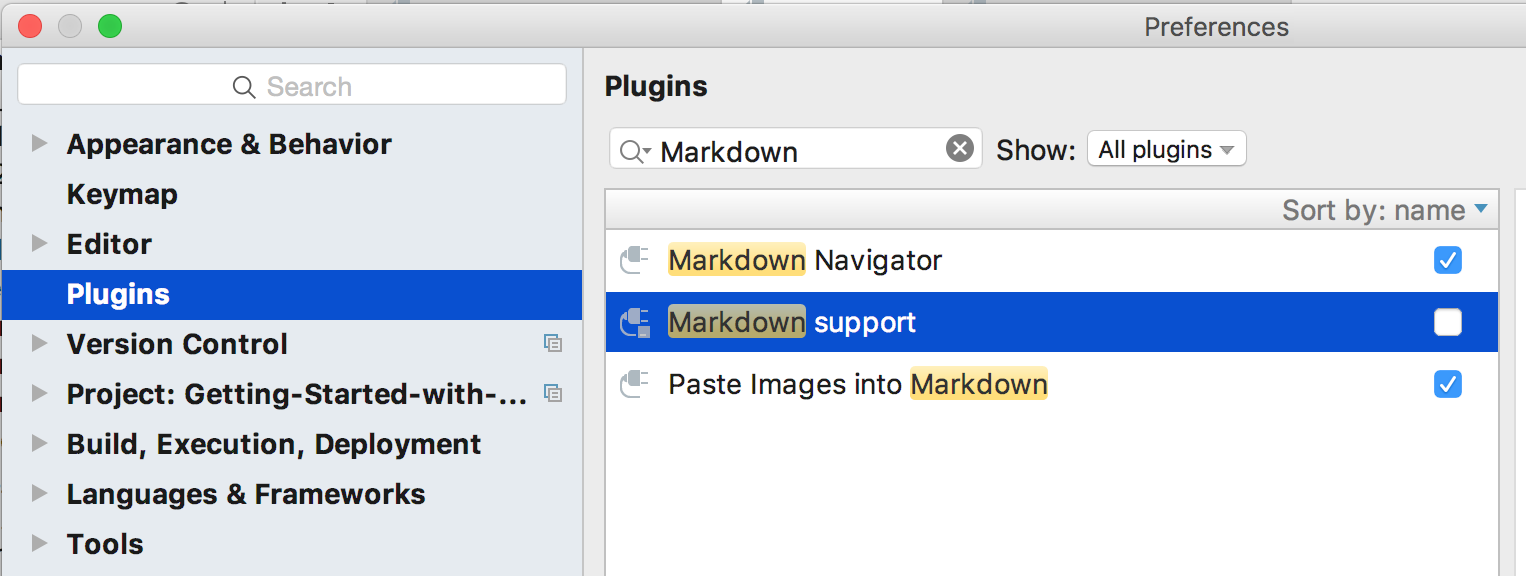
IDE推荐采用PyCharm CE,为了更好的markdown编辑效果,安装上这2个markdown插件:Markdown Navigator和Paste images into MarkDow.
TensorFlow环境安装
采用conda创建一个隔离的python和Anaconda虚拟环境
我们将虚拟环境命名为tensorflow:1
2➜ ~ conda create -n tensorflow python=3.6 anaconda
➜ ~ source activate tensorflow
现在应该已切换到tensorflow环境了,shell提示符应该显示出当前所在环境的名称了。
检查确定各个命令的路径和版本:
1 | (tensorflow) ➜ ~ which python |
安装tensorflow 1.0.1的python包
因为我们采用了Anaconda发行,正常情况安装package需要采用conda命令,但是conda仓库里官方channel anaconda里没有osx-64的tensorflow包,只有linux-64的,因此还是只能采用pip来安装tensorflow包:
2018-8-16更新:现在官方channel
anaconda里已经有osx-64的tensorflow包了,且是最新的1.9.0版本了。官方channel
anaconda的tensorflow查询网址:
非GPU版本:https://anaconda.org/anaconda/tensorflow
不包含tensorflow-tensorboard的非GPU版本:https://anaconda.org/anaconda/tensorflow-base
GPU版本:暂无osx-64:https://anaconda.org/anaconda/tensorflow-gpu
不包含tensorflow-tensorboard的GPU版本:暂无osx-64:https://anaconda.org/anaconda/tensorflow-gpu-base
设置TF_PYTHON_URL环境变量:1
2
3
4
5
6
7# CPU版本的安装包:
(tensorflow) ➜ ~ export TF_PYTHON_URL=https://storage.googleapis.com/tensorflow/mac/cpu/tensorflow-1.0.1-py3-none-any.whl
或者:
# GPU版本的安装包:
(tensorflow) ➜ ~ export TF_PYTHON_URL=https://storage.googleapis.com/tensorflow/mac/gpu/tensorflow_gpu-1.0.1-py3-none-any.whl
安装:1
2
3
4
5
6
7
8
9
10
11
12
13
14
15
16
17
18
19
20
21
22
23
24
25
26
27
28(tensorflow) ➜ ~ pip install --ignore-installed --upgrade $TF_PYTHON_URL
Collecting tensorflow==1.0.1 from https://storage.googleapis.com/tensorflow/mac/cpu/tensorflow-1.0.1-py3-none-any.whl
Downloading https://storage.googleapis.com/tensorflow/mac/cpu/tensorflow-1.0.1-py3-none-any.whl (39.3MB)
100% |████████████████████████████████| 39.3MB 18kB/s
Collecting wheel>=0.26 (from tensorflow==1.0.1)
Downloading wheel-0.29.0-py2.py3-none-any.whl (66kB)
100% |████████████████████████████████| 71kB 332kB/s
Collecting six>=1.10.0 (from tensorflow==1.0.1)
Downloading six-1.10.0-py2.py3-none-any.whl
Collecting protobuf>=3.1.0 (from tensorflow==1.0.1)
Downloading protobuf-3.2.0-py2.py3-none-any.whl (360kB)
100% |████████████████████████████████| 368kB 401kB/s
Collecting numpy>=1.11.0 (from tensorflow==1.0.1)
Downloading numpy-1.12.1-cp36-cp36m-macosx_10_6_intel.macosx_10_9_intel.macosx_10_9_x86_64.macosx_10_10_intel.macosx_10_10_x86_64.whl (4.4MB)
100% |████████████████████████████████| 4.4MB 58kB/s
Collecting setuptools (from protobuf>=3.1.0->tensorflow==1.0.1)
Downloading setuptools-35.0.1-py2.py3-none-any.whl (390kB)
100% |████████████████████████████████| 399kB 182kB/s
Collecting packaging>=16.8 (from setuptools->protobuf>=3.1.0->tensorflow==1.0.1)
Downloading packaging-16.8-py2.py3-none-any.whl
Collecting appdirs>=1.4.0 (from setuptools->protobuf>=3.1.0->tensorflow==1.0.1)
Downloading appdirs-1.4.3-py2.py3-none-any.whl
Collecting pyparsing (from packaging>=16.8->setuptools->protobuf>=3.1.0->tensorflow==1.0.1)
Downloading pyparsing-2.2.0-py2.py3-none-any.whl (56kB)
100% |████████████████████████████████| 61kB 115kB/s
Installing collected packages: wheel, six, pyparsing, packaging, appdirs, setuptools, protobuf, numpy, tensorflow
Successfully installed appdirs-1.4.3 numpy-1.12.1 packaging-16.8 protobuf-3.2.0 pyparsing-2.2.0 setuptools-35.0.1 six-1.10.0 tensorflow-1.0.1 wheel-0.29.0
Validate your installation
在Python shell下运行如下TensorFlow代码,检查TensorFlow安装的可用性:1
2
3
4
5
6
7
8
9
10$ python
Enter the following short program inside the python interactive shell:
>>> import tensorflow as tf
>>> hello = tf.constant('Hello, TensorFlow!')
>>> sess = tf.Session()
>>> print(sess.run(hello))
If the system outputs the following, then you are ready to begin writing TensorFlow programs:
Hello, TensorFlow!
关于SSE4.1 instructions issue
issue 7778: “The TensorFlow library wasn’t compiled to use SSE instructions, but these are available on your machine and could speed up CPU computations” in “Hello, TensorFlow!” program.
上述安装完成后,在macOS上执行tf.Session()时会报如下warning,大意是google预先编译好的安装包没有利用上Macbook Pro机器CPU的一些加速指令,但不会影响tensorflow的使用。先不用理它,等以后采用源代码来编译、安装TensorFlow。
1 | >>> sess = tf.Session() |
TF_CPP_MIN_LOG_LEVEL is a TensorFlow environment variable responsible for the logs:
- It defaults to 0, showing all logs
- To filter out INFO set to 1
- WARNINGS, additionally 2
- and to additionally filter out ERROR logs set to 3
如果想在logs里过滤掉这个SSE4.1 instructions warning,可用两种方法来配置TF_CPP_MIN_LOG_LEVEL:
1. 代码形式:1
2
3import os
os.environ['TF_CPP_MIN_LOG_LEVEL']='2'
import tensorflow as tf
2. UNIX环境变量形式:1
export TF_CPP_MIN_LOG_LEVEL=2
matplotlib的backend配置
1. 先确定配置文件是哪个?1
2
3>>> import matplotlib
>>> matplotlib.matplotlib_fname()
'/Users/albert.zheng/.matplotlib/matplotlibrc'
2. 配置backend
上述tensorflow环境安装时已给macOS安装了的backend是:WebAgg, Qt5Agg,推荐使用Qt5Agg。注:MaxOSX这个backend经测试,发现无法进行显示。
1 | $ vi ~/.matplotlib/matplotlibrc |
如果backend配置有误,一旦import matplotlib及它下面任何module,就会报错和给出可选的配置项名称,例如如下:
1 | >>> import matplotlib |
Option:也可采用conda命令来安装TensorFlow的python包
1. 非官方channel conda-forge有osx-64, linux-64, win-64的tensorflow包,可在这个页面(https://anaconda.org/conda-forge/tensorflow)上查询到。
1 | ➜ ~ conda search -c conda-forge tensorflow |
To install this package with conda run:1
conda install -c conda-forge tensorflow=1.0.0
2. Anaconda官方channel的linux-64平台的tensorflow包可在这个页面(https://anaconda.org/anaconda/tensorflow)上查询到。
To install this package with conda run:
1 | conda install -c anaconda tensorflow=1.0.1 |